Interactivity
This page covers the setup and usage of interactive grass features. Make sure you have first gone through the setup of the grass shader and can follow along using your mesh setup in the scene.
Video Tutorial
Quick Setup
To add interactive behaviour to the grass, you need to input the Grass Manager into the scene, as well as Grass Interactor onto any object you want interactive behaviour from.
Additionally, if you are looking for interactive behaviour for the mouse, you will need to add the Grass Mouse Interactor script onto the main camera in your scene. All of it covered below.
Grass Manager
The Grass Manager is responsible for managing all interactive grass elements in the scene. There is also global settings for the wind and recovery of the grass from interactions.
Wind Settings
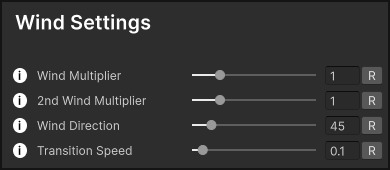
Wind Settings let you adjust the wind dynamically at runtime for a real weather effect.
These settings are covered in the Getting Started section.Grass Recovery
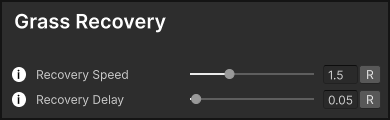
Grass Recovery settings allow you to control how the grass returns to its original state after being interacted with. These are global values and will affect all of the grass in the scene.
Recovery Speed adjusts how quickly the grass returns to its original state after being interacted with. Recovery Delay adjusts the delay before the grass starts to recover after being interacted with.
Recommended Settings: For natural behavior, use low values for both Recovery Speed and Recovery Delay.Runtime Changes
Important! On Start, a method called FindGrass( ) is executed, which finds all of the grass in the scene to make it interactable.If you want to add/change grass at runtime, you can call the FindGrass method again to update the interactive grass elements as it is a public method. Do it from any script in your project, just reference the Grass Manager script, and run the grassManager.FindGrass( ); method.
Grass Interactor
The Grass Interactor is responsible for handling the interactions between the grass and other objects in the scene. It allows objects to affect the grass, bending and pushing it. You can have as many interactors in the scene, just make sure to add the Grass Interactor component to each.
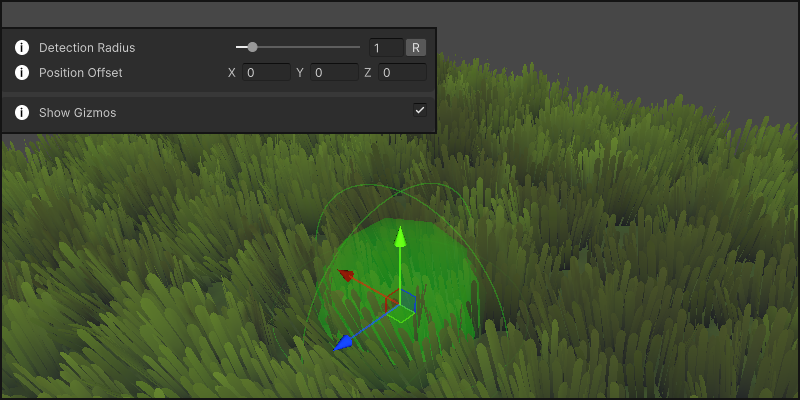
Interaction Settings
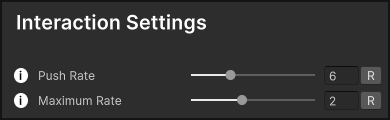
These values are per interactor so each interactor can behave differently.
Push Rate acts as strength that gets applied to the grass when on top of the grass. This value accumulates and can intensify the push effect with continuous movement in the same area. Maximum Rate limits how much of the push rate can be accumulated.Motion Detection
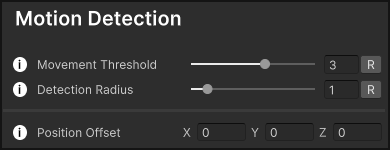
You can limit at what speed interaction takes place with Movement Threshold But generally keep this value below 1, at low threshold to prevent any jitter as with value of 0 it will always keep updating the grass and pushing it based off interactor's position. Use gizmos to view this (It turns yellow when in motion)
Detection Radius determines the area around the interactor where it can detect and affect the grass. Adjusted depending on the size of your character/interactor.
If you need to change the position of where the interaction takes place use the Position Offset to adjust the center of the detection radius.

At the bottom you have the option to turn on/off the gizmos for the grass interactor to see the size of the detection radius, and where it is depending on the position offset.
Mouse Interaction Handler
The Mouse Grass Interaction Handler provides data from the mouse position off the camera using a ray to allow an interactor to follow the mouse position and interact with the grass.
Setup

Assign an empty game object with the Interactor component to the Mouse Grass Interaction Handler. This gameObject will follow the mouse position and interact with the grass where the ray hits.
Include inside the Interactive Layer all of the layers you want the mouse handler to interact with.
Distance value determines how far the ray from the camera will reach.
At the bottom you have the option to turn on/off the gizmos for the mouse handler to preview the distance of the ray from the camera.

That covers the interactivity with the A+ Grass Shader!
If you like the asset, please consider leaving a review on the Unity Asset Store!
Leave A Review